Sunday, January 29, 2012

16 Days until Valentines Day!


Love is not proud, Love does not boast,
Love after all matters the most...
Love does not run, Love does not hide,
Love does not keep locked inside...
Love is the river that flows through
Love never fails you

Love will sustain, Love will provide, Love will not cease at the end of time

Love will protect, Love always hopes, Love still believes when you don’t
Love is the arms that are holding you
Love never fails you
When my heart won’t make a sound
When I can’t turn back around
When the sky is falling down
Nothing is greater than this
Greater than this

Love is right here, Love is alive, Love is the way the truth the life...

Love is the river that flows through
Love is the arms that are holding you
Love is the place you will fly to
Love never fails you
-Brandon Heath-Love Never Fails


16 days until Valentine's Day!
Which means it's time to start making those beautiful home-made Valentines cards!
When it comes to making my Valentines cards I always like to incorporate a Bible verse on love.
It's a little reminder to everyone of the miraculous love that our Lord Jesus Christ has for us.
My Valentines cards this year are a bit time consuming but pretty easy non the less...


Scrap booking Paper
Glue
Scissors
Blank Card
Pen

Time: 10 to 20 minutes


Cut a strip of scrap booking paper like the picture above (which is the actual size of this strip of paper I will be making this heart from).
Don't feel like you have to measure anything, customize your hearts according to the way you think they should look.
I made mine all different sizes and lengths, this is the perfect craft to add your own unique style and personality too... :)


Fold in half and crease...


Open up your folded piece of paper and roll down one side of the "V"...


Roll down the other side of your
scrap booking paper...
Now that you have made your heart grab a bottle of glue and squirt some out on a plate and dip the back of your heart into the glue... remove and place on a card of your choosing in any fashion you so desire...
 I created three rows of four hearts like the picture below...
After gluing all your paper hearts you can write a verse, words, song lyrics, etc... under each
 heart like so...
(I used parts of 1 Corinthians 13)


Just remember, there is no wrong way to make this card. Add your own touch and make it special! Have fun and Happy Valentines Day! :)

Micaela


Friday, January 20, 2012

Tutorial- Crochet Facial Washers


Have I ever mentioned I can't follow a pattern, any pattern, to save my life? :) Well, I can't and this is why whenever I crochet, I just make up my own pattern...

So, here is one of my original patterns for "Crochet Facial Washers!"

These facial washers are so soft, and perfect for washing your face with your favorite facial wash...
They're reusable, so I guess you could consider them a "green" product, seeing how they will save you from buying all those cotton balls or disposable facial washing pads that a lot of people use... ;)


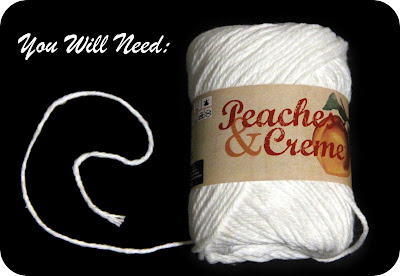
Yarn (100% cotton)
Crochet Hook ( H/8-5.00mm )
Scissors

Time: five to ten minutes...


Chain five.
Join with a slip stitch.
Chain two.

Double crochet in round nine times.
join with a slip stitch.
Chain one.
In every space, single crochet two, in round.
Join with a slip stitch.
Chain two.

Count as 1,2,3...
In every third space double crochet two.
Join with a slip stitch.
Chain one

Count as 1,2,3...
In every third space single crochet two
Join with a slip stitch.
Chain one.
Repeat process two more times,
creating two more rows...
(remember to chain one each time
 you start a new row)


Fasten off...
Weave in extra string...


And there you have it, a beautiful, soft, crochet facial washer!

Micaela

Hope you found this tutorial useful! Let me know if you have any trouble with it
 in the comments and I'll try to help you out... :)

Tuesday, January 10, 2012

Updates

Hello Crafters,

I thought with the New Years arrival I should update the blog a bit and bring everyone up to date on what this year holds for "Micaela's Craft Blog"!

So, this week I've been working on the blog a bit...
I am trying to make it easier and more convenient for everyone! :)

If you take a look at the side bar the first new item you will see is below my wonderful followers :)...
You can now be updated and informed with the latest craft post by following me by email!

My second new addition to the blog is labeling all the posts. This can be found under "Blog Archive".
This allows you to easily find a craft, or crafts like it, because they are all in one easy to find, organized place.

Thirdly, I have put up a poll...
This poll is just for fun and is asking everyone what there favorite craft, from "Micaela's Craft Blog" has been so far. Be sure to check it out... this poll will be closing 1/18/12 at 10:44 a.m. :)

Last, but not least, I have put up some pictures of the craft post and if you click on them they will take you right to their page.

A few of my New Years resolutions are to post on this blog about every nine to ten days...
I do a lot of crafting so it shouldn't be too hard to keep that resolution! :)
If there is any particular craft you would like to see on the blog just let me know by leaving a comment in the comment box below.
I will be happy to read any of your suggestions.

I am also in the process of starting an Etsy Shop, an online store where you can sell homemade craft items. I will be posting more details about that later...

I have talked to a few friends who said they would guest post a tutorial of a craft for my blog, so I am really excited about that!

Well, I think that's about it, except I forgot to mention that there will be one or two surprises through out the year for the crafters who follow "Micaela's Craft Blog"! :)

So, now your all caught up... :)
I hope you all have a wonderful 2012!

Micaela

Friday, January 6, 2012

Tutorial: Bow Bookmarks


Don't you just think these are the cutest little bookmarks ever?! :)
A few minutes, some scraps of fabric, paper clips and a couple drops of hot glue and you too can make a "Little Bow Bookmark"!
These bookmarks are so easy and quick to make that you can end up with more than you know what to do with! :)

Scissors
Scrap Fabric
Paper Clips
Hot Glue Gun
Wire


Cut a strip of fabric 6 1/2 inches to 7 inches long.
Lay one end of the strip of fabric over the other end and scrunch the middle.
Wrap a small piece of wire around the middle to hold the scrunch...it now should look something like the picture above.

Make a French knot by taking a smaller piece of fabric and tying a knot on it, like the picture above.
Place the knot in the center of the bow and then bring the excess fabric to the back securing it with a dot of hot glue. Cut the rest of the fabric off with your scissors.

Turn your bow on it's back and apply a dot of hot glue in the center, adding a paper clip quickly to the glue before it dries...
and as quick as a wink you have an adorable little bow bookmark that will
save your books pages in a unique and cute way!
Micaela