My first craft post! I'm so excited, and since it's December, the month for crafting, crafting, crafting (that is if your a procrastinator like myself ) other wise you probably would have started in October and are pretty much finshed with your Christmas gifts!:). I will be posting a lot!
So, in preparation for Christmas I have been working on these cute little paper origami heart ornaments, that I'm also doubling as gift tags for some gifts!
These beautiful heart ornaments are pretty easy and don't require too much time to make!
You will need:
paper
scissors
a dollar bill
paper clips
card stock
ribbon
single whole punch
Time: about five to seven minutes
To make your origami heart template, take a dollar bill and place it on a piece of card stock.
Secure your dollar bill with paper clips. Cut along the sides of the dollar bill until it is released from the extra card stock. Unfasten paper clips and remove the dollar bill from your rectangular piece of card stock. Take a pen and write "Origami Heart Template" on the card stock. This will be your template for all of your origami heart ornaments.
Place your "Origami Heart Template" on a piece of paper of your choosing, fastening with paper clips. Cut along the edges of template until it is released from the paper. Unfasten paper clips and remove template.
Turn your rectangle to the end that does not have the pop up triangle on it and repeat steps two and three.You will now have something that looks like the picture above.
Now take one of the triangles and bend it back to the back and make a crease.
Return triangle back to diamond shape and repeat process to the other triangle side.
Take the right side of your diamond and pull the triangle so that it is touching the left triangles edge like the picture above. Push down and make a crease along the skinny rectangular flap in the back.
Turn your diamond so that a point of one of the triangles is pointing towards you like the first picture on the left at the top. Lift up the top triangles right bottom flap and fold it up to the triangles top point. Then lift up the top triangles left bottom flap and fold it up to the triangles top point like the middle picture at the top. Now flip your diamond so that the triangle you just worked on is pointing towards you and the triangle that was pointing towards you is at the top and repeat the folding technique that you just did. You should now have something that looks like the last picture at the top on the right.
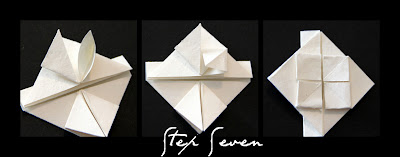
Now for step seven. It will be very easy to figure it out by the pictures above. You just simply take one of the triangular flaps that you folded in step six and open them up and push them down.
Step eight is very similar to step six. Once you have all your triangles push down into diamonds in step seven, you just take the right or left corner of that diamond and fold it in half like the picture on the left up top. Then open the little flaps like you did in step seven and push down only this time the pushed down part will look like the picture on the right above.
Take the right and left corners and bend them back just far enough so that there not pointy anymore.
Flip your paper where the funny little rectangle in the back is on the right. Turn over your paper and pull this rectangle until it looks like the picture on the left above and crease it. Turn your paper back over and tuck the rest of the rectangle that now looks like a triangle in the back. And there you have it! A heart that you now can turn into an ornament with a simple punch from a hole-punch in the back near the top and a piece of ribbon to slip through the hole with a simple tie of a knot! Enjoy...
Micaela
Hoped you found this tutorial useful! Let me know if you have any trouble with it in the comments and I'll try to help you out...
Hoped you found this tutorial useful! Let me know if you have any trouble with it in the comments and I'll try to help you out...


No comments:
Post a Comment